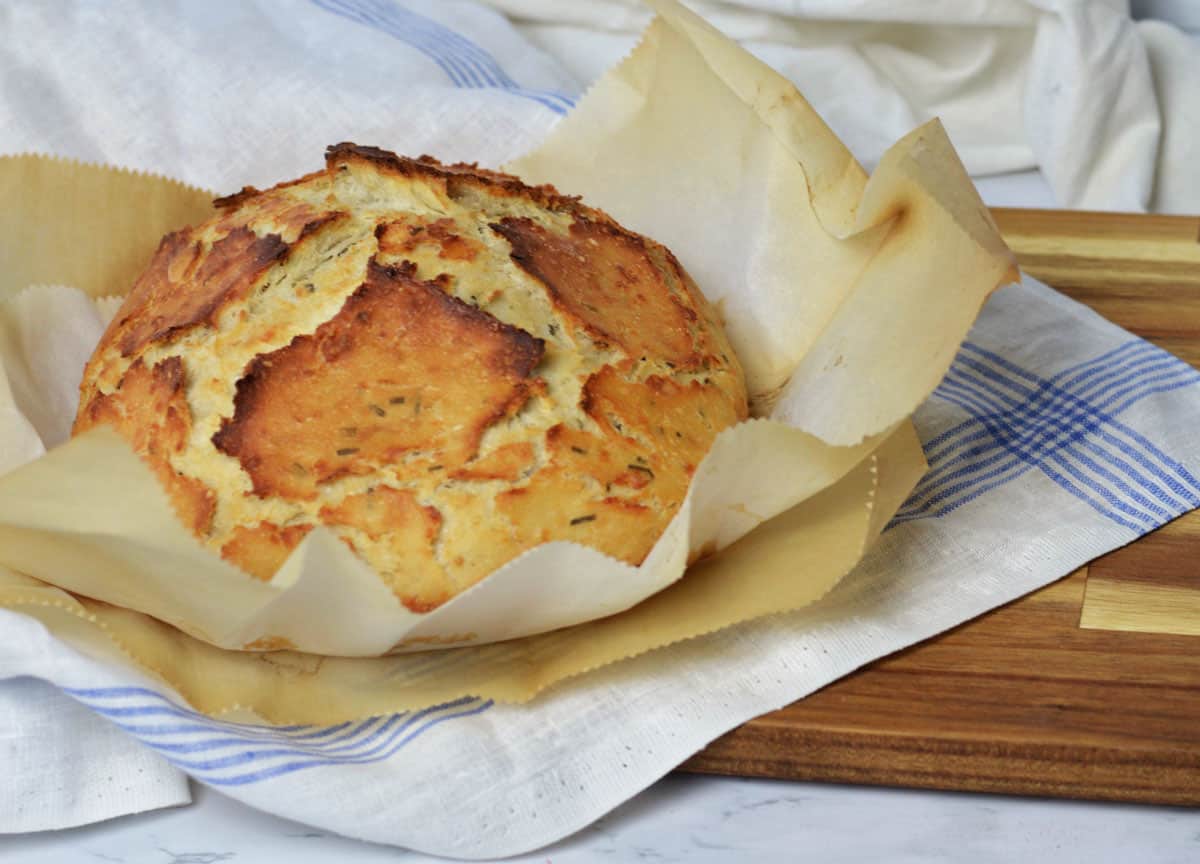
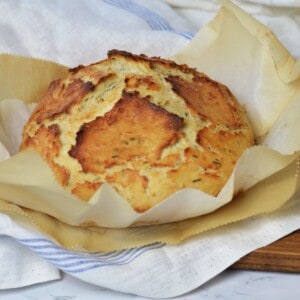
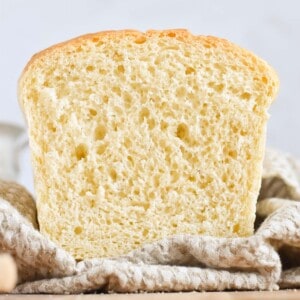
This easy herb artisan bread is a no-knead, 5-minute, rustic bread with a crunchy crust and soft, chewy interior. A Dutch oven bread, it's flavored with Parmesan cheese, garlic, parsley, and rosemary.
Jump to:
Why this Recipe Works
Top Reasons You'll Love this Recipe
- Easy. It takes about five minutes to prep this Dutch oven bread.
- Crisp. The crisp crust of herb and cheese bread has perfect crunch.
- Tender. This round crusty loaf has a soft, chewy interior.
- Delicious. This recipe without the herbs and cheese is stellar. Add herbs and cheese and you take it up a notch.
- Versatile. Try this bread for supper with soup, salad or pasta.
What's better than the aroma of fresh baked bread wafting through your home? The singular answer is eating homemade bread warm from the oven! The only thing as remarkable as how good this bread is, is how easy it is to make. Herb and cheese bread is good alongside almost any meal. It's one of the easiest things you'll ever make. Promise. And you can experiment with other favorite cheeses and herbs. It's also an economical, and an easy food gift or neighbor christmas gift.
Ingredient Notes
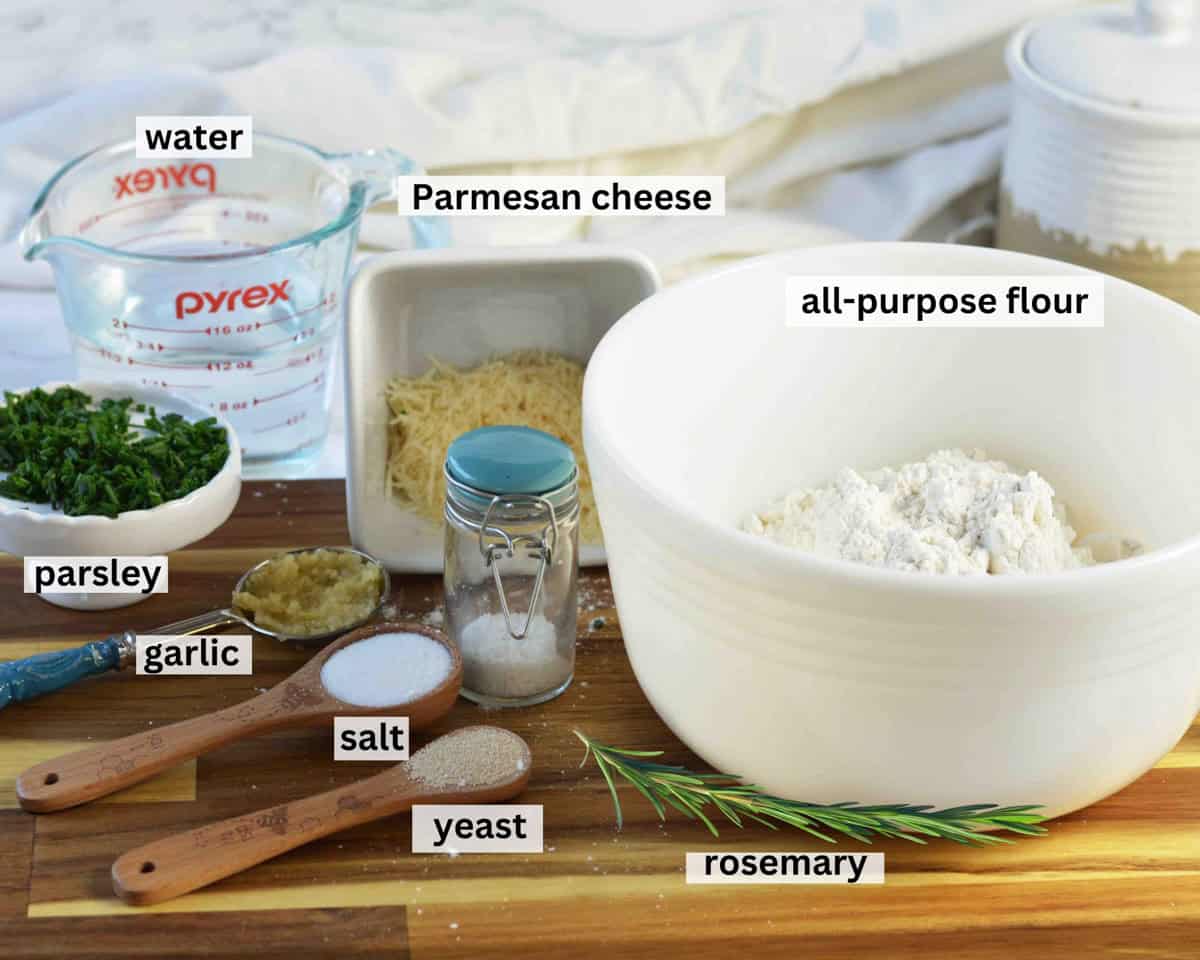
- All-Purpose Flour. Flour forms the foundation of the bread and gives it structure.
- Salt. Salt enhances the flavor of the bread. We like the intense flavor of coarse salt.
- Dry Yeast. Yeast is a leavening agent for this bread. This recipe uses very little yeast.
- Parmesan Cheese. The cheese adds a salty rich flavor to the bread.
- Fresh Garlic. Garlic adds depth and flavor to the bread.
- Fresh Parsley. Parsley gives the bread a bright fresh flavor.
- Fresh Rosemary. Rosemary gives the bread an earthy, sweet flavor.
- Water. Water blends the ingredients and forms steam which helps the bread rise.
How to Make this Recipe
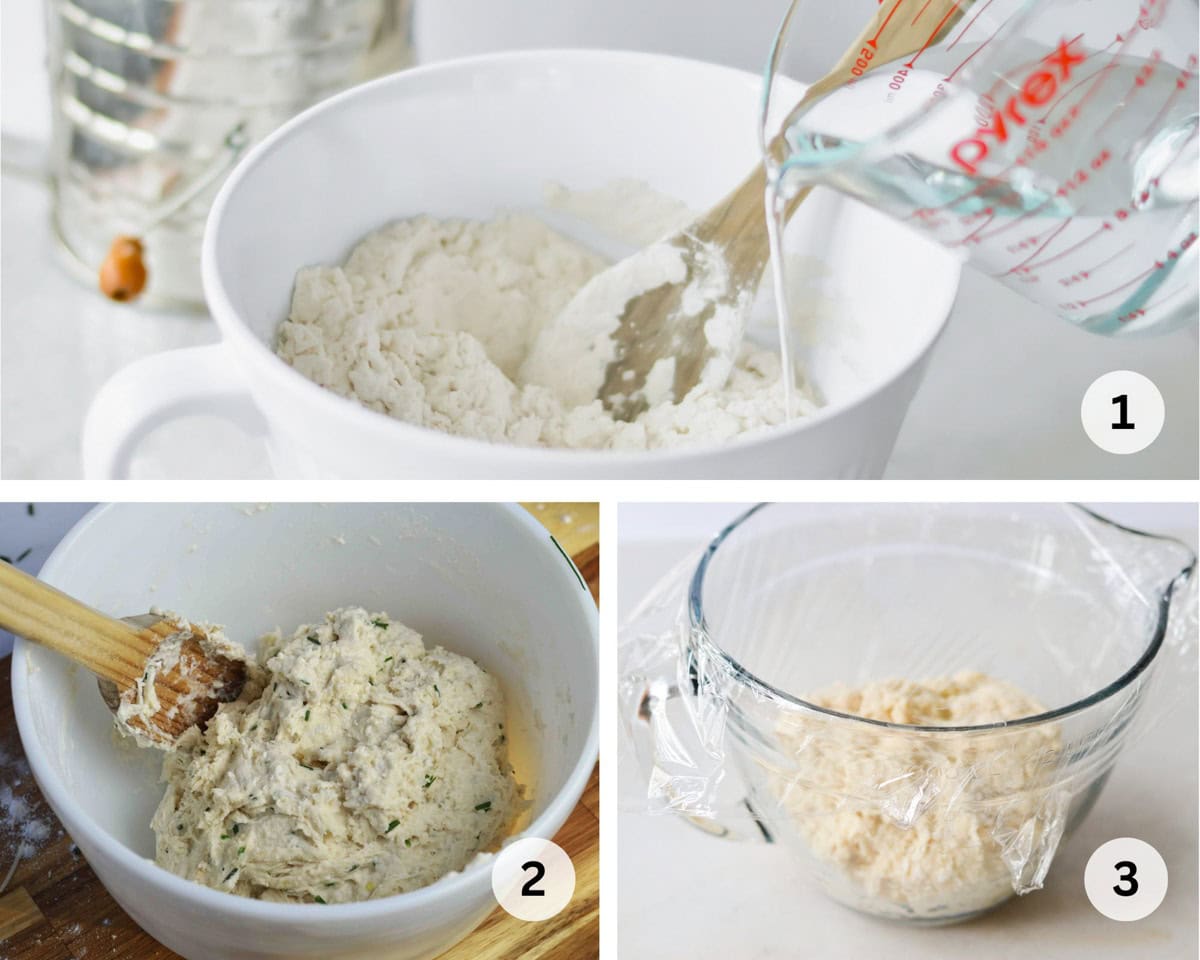
- Mix ingredients. Place flour, salt, yeast, Parmesan cheese, garlic, parsley and rosemary in a mixing bowl. Gradually add water; stir until mixed.
- Mix dough. Stir dough gently until it forms a rough ball.
- Move dough to bowl. Transfer dough to a large clean, ungreased, mixing bowl. Cover with plastic wrap. The next step requires no work on your part.
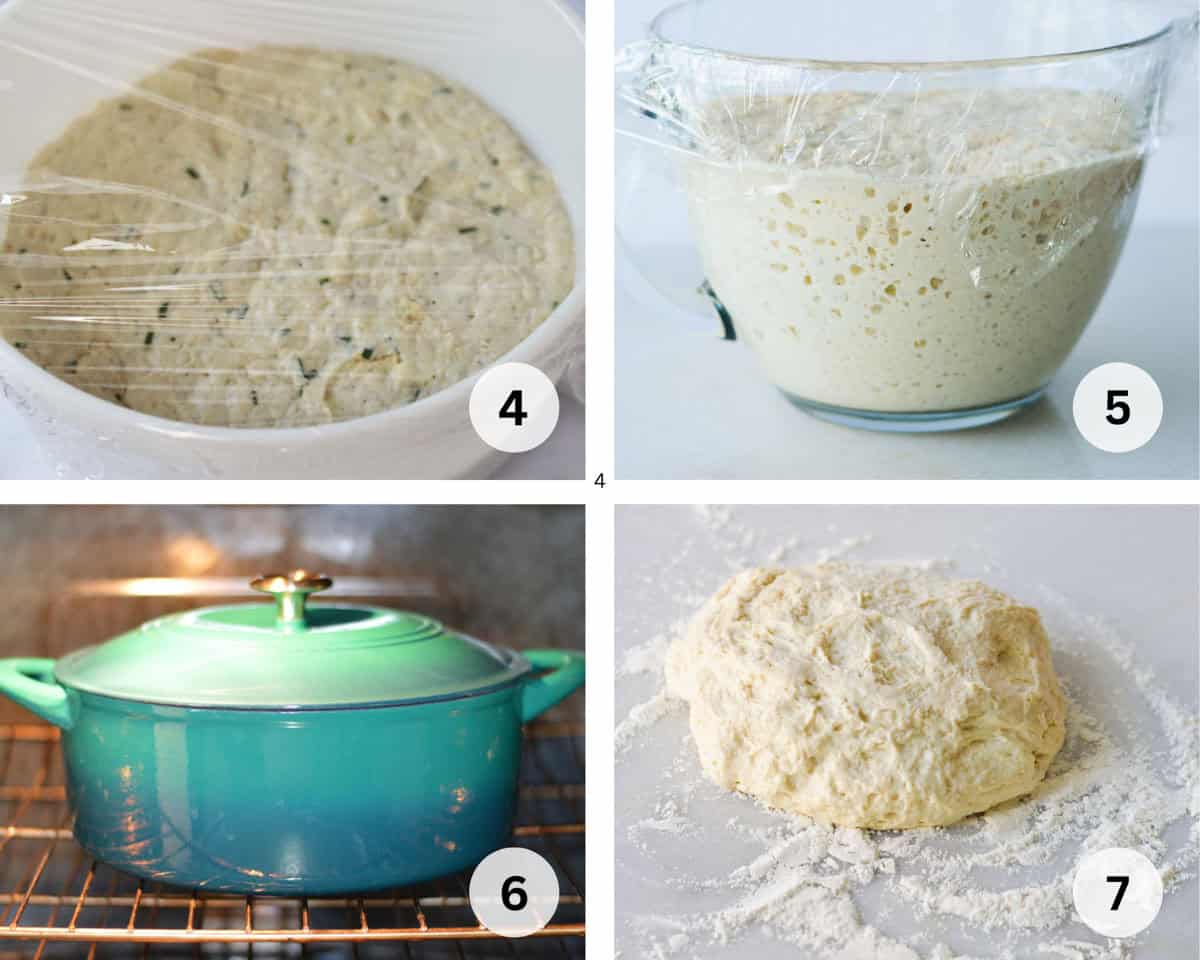
- Rise. Let dough rise at room temperature until surface of dough is covered with tiny bubbles and the dough has more than doubled in size.
- Continue rising. For best results, let dough rise 18 - 24 hours.
- Prepare Dutch oven. Before baking, place an empty Dutch oven, with its lid, into the oven and turn it on to 450 degrees. Allow it to heat in the oven for 30 minutes.
- Form loaf. Remove dough from bowl and place on a well-floured surface. Create a smooth ball by pulling corners of dough underneath until the surface is smooth.
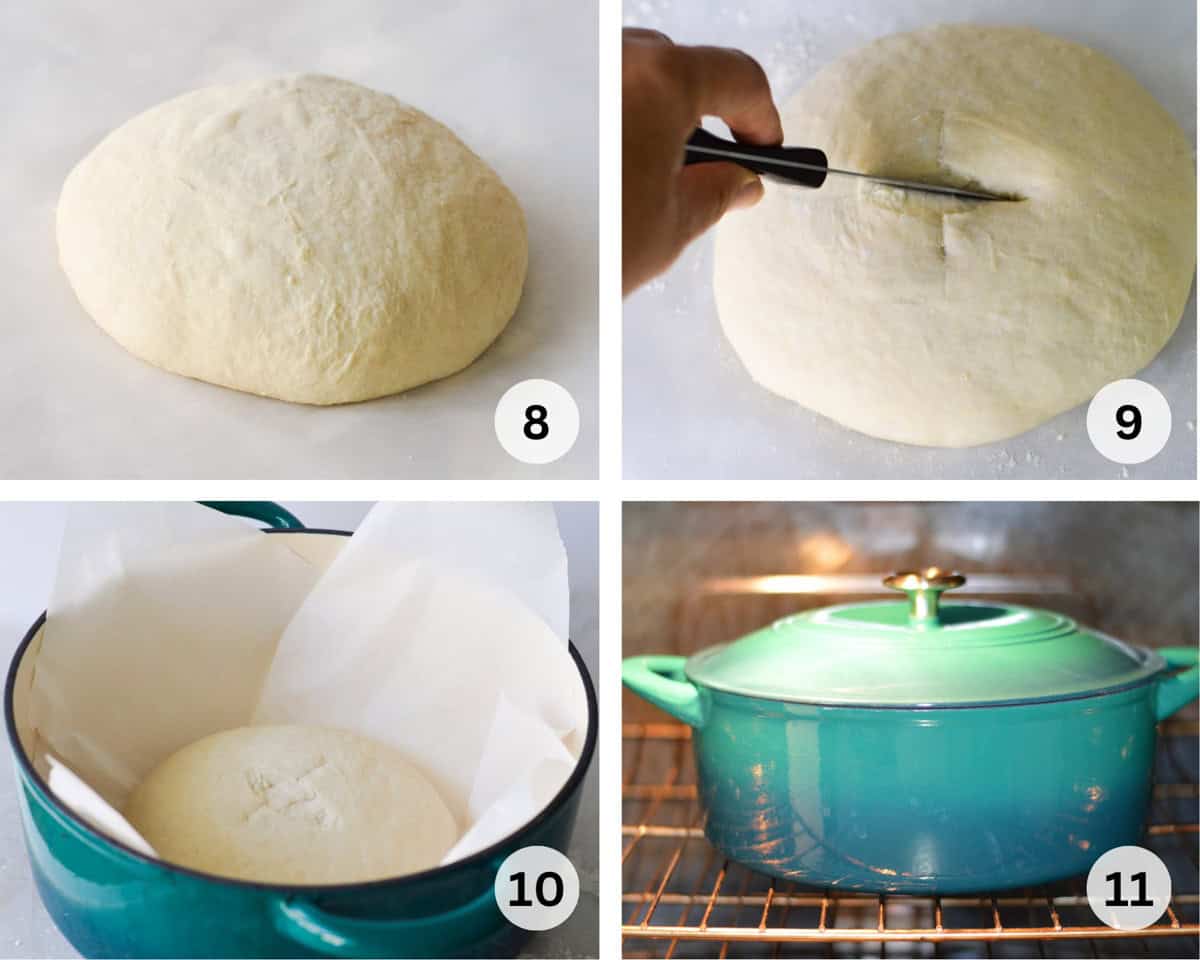
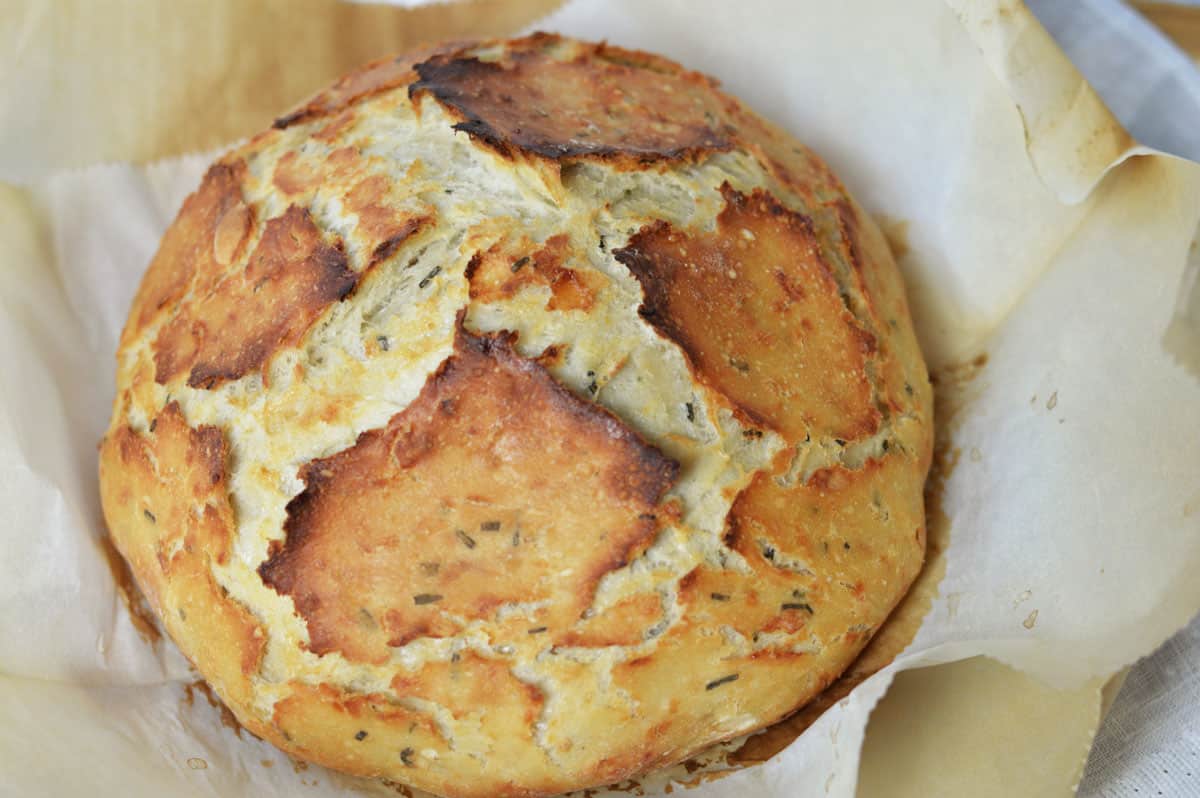
- Rest dough. Place dough on a square of parchment paper big enough to cover bottom of the Dutch oven. Dust dough with flour, cover it with plastic wrap and let it rest 10-15 minutes.
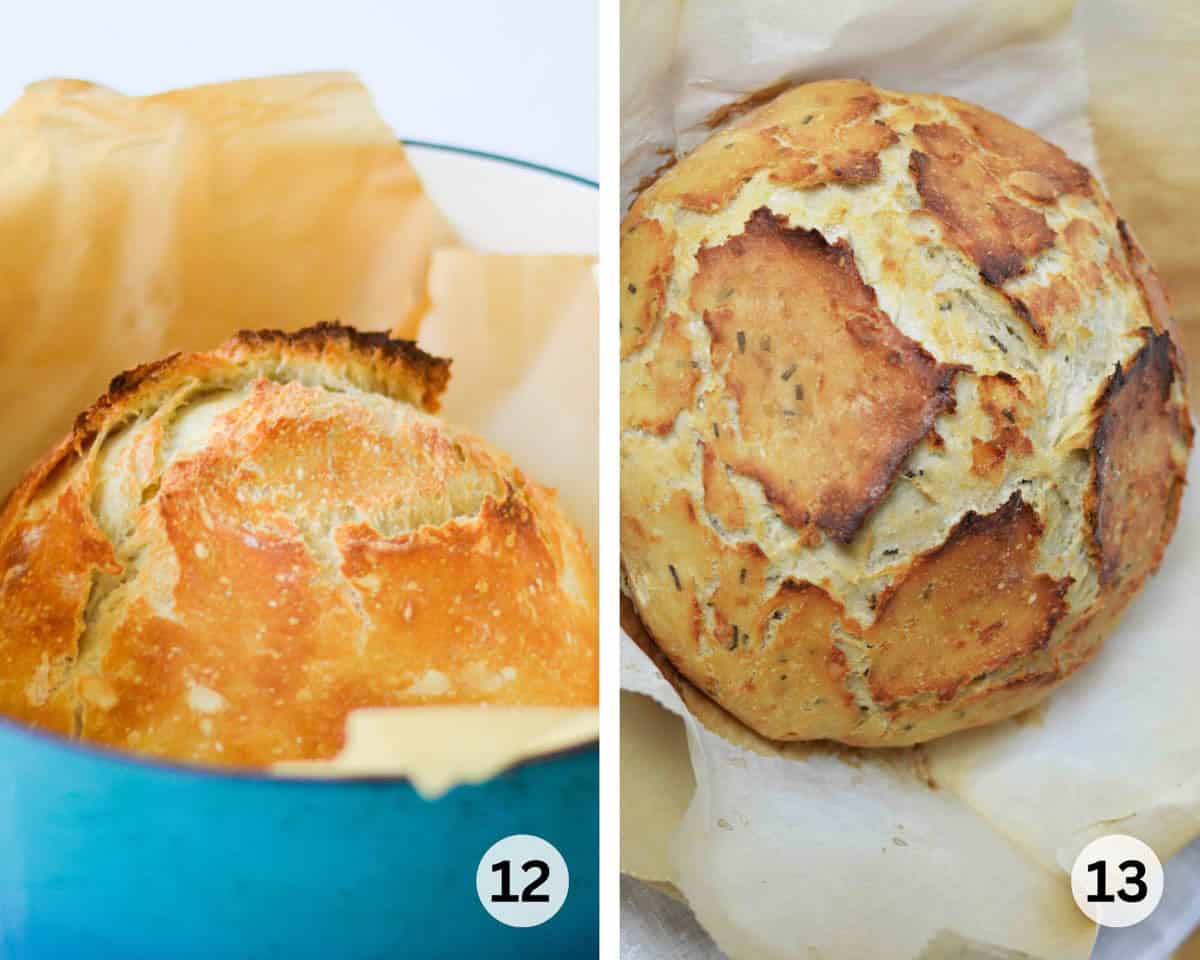
- Score loaf. Using a sharp knife, score the top of the loaf with an X. (Cut about ¼ inch deep and 2 ½ inches long for each side of X.) Lightly dampen your hands and carefully pat the top of the dough ball. (This will help your bread brown.)
- Bake. Carefully remove Dutch oven from the oven. Remove lid, then lift corners of parchment paper and lower dough into hot pan.
- Replace lid. Put the lid back on and return to the oven. Bake 30 minutes.
- Brown. Remove lid and bake additional 10 minutes or until the top is browned.
- Cool. Remove from oven and place bread on a cooling rack. Allow it to cool for at least 30 minutes before slicing.
What to Serve with this Herb Artisan Bread?
Herb and cheese bread would be a perfect accompaniment to many of our recipes. Here are a few delicious soups and salads to try:
Frequently Asked Questions (FAQs)
Fresh herbs are the best in homemade bread, and you need less of them compared to dry herbs.
By adding the herbs during the mix/knead process, the herbs have a chance to infuse your bread dough with flavor while the dough is rising.
Dutch oven bread is easier with parchment paper because you can use it to lift the hot bread, and it's easier to clean up.
We use the Dutch oven lid on to start. This gives steam needed to help the bread rise. Then we remove the lid for the last 10 minutes to get a crunchy crust.
A Dutch oven, with its cast iron walls, resembles the environment of a professional bakery with a moisture sealed chamber and intense, even heat. The lidded pot which traps steam, helps the bread rise, and deepens crust color.
The benefits of no knead bread include, speed of mixing, good texture and delicious flavor.
Expert Tips
- Spice up your Dutch oven bread. We like adding one or more of these herbs: rosemary, basil, fennel, thyme.
- Aerate your flour before measuring. Use a large spoon or spatula and stir the flour around to incorporate some air. Since flour settles in the bag or container, you should aerate it so you don't use too much flour and make your bread dry.
- Preheat the Dutch oven before baking bread. You'll get better dough volume and even cooking when it's preheated.
- Makes a great gift. Herb and cheese bread makes a delicious and economical food gift or neighbor christmas gift.
- Baking stone can be an alternative. If you don't have a Dutch oven, baking bread on a pre-heated baking stone is an option.
- Use a crock-pot covered with foil. Another alternative to a Dutch oven is a crock-pot. You can use the insert of a crock-pot (not the lid) or any deep enameled stoneware you might have, just cover it with foil.
Serving and Storage Tips
- Cool first. Let the bread cool 30 minutes before slicing. If you cut it sooner, the bread will smash together.
- Cutting bread. Once your bread is cool, cut it with a serrated knife and serve with butter. Cutting it sooner will smash the bread.
- Keep bread from molding. This bread has no preservatives. You can put bread in the refrigerator or freezer to keep it from growing mold.
- Freeze bread. You can freeze the loaf of bread once it's completely cool. Place it in an airtight container or zip loc bag. It will stay good in freezer for up to three months. When ready to serve, take out of freezer and thaw before cutting.


Herb and Cheese Bread
Ingredients
- 3¼ cups all-purpose flour
- 2 teaspoons coarse Kosher sea salt
- ½ teaspoon dry yeast
- ½ cup grated Parmesan cheese
- 4 cloves garlic minced
- 1 tablespoon fresh parsley chopped
- 1 tablespoon fresh rosemary chopped
- 1 ½ cups warm water
Instructions
- Place flour, salt, yeast, Parmesan cheese, garlic, parsley, and rosemary in a mixing bowl. Gradually add the water, stir until mixed well. Mix dough gently until it forms a rough ball.
- Transfer dough to a large clean, ungreased, mixing bowl. Cover with plastic wrap and let dough rise at room temperature until surface of dough is covered with tiny bubbles and the dough has more than doubled in size. For best results, let dough rise 18 - 24 hours.
- Before baking, place an empty Dutch oven, with its lid, into the oven and turn it on to 450 degrees. Allow it to heat in the oven for 30 minutes.
- Remove dough from bowl and place on a well-floured surface. Create a smooth ball by pulling corners of dough underneath until the surface is smooth. Place dough on a square of parchment paper big enough to cover bottom of the Dutch oven. Dust dough with flour, cover it with plastic wrap and let it rest 10-15 minutes.
- Using a sharp knife, Score the top of the herb and cheese loaf with an X. (Cut about ¼ inch deep and 2 ½ inches long for each side of X.) Lightly dampen your hands and carefully pat the top of the dough ball. (This will help your bread brown.)
- Carefully remove Dutch oven from the oven. Remove lid, then lift corners of parchment paper and lower dough into hot pan. Replace lid and return to the oven. Bake 30 minutes.
- Remove lid and bake additional 10 minutes or until the top is browned.
- Remove from oven and place the bread on a cooling rack. Allow it to cool for at least 30 minutes before slicing.
Notes
- If you don't have a Dutch Oven, you can use the insert of a crock-pot (not the lid) or any deep enameled stoneware you might have, just cover it with foil.
- Aerate your flour before measuring. Use a large spoon or spatula and stir the flour around to incorporate some air. Since flour settles in the bag or container, you should aerate it so you don't use too much flour and make your bread dry.
- Let the bread cool 30 minutes before slicing. If you cut it sooner, the bread will smash together.


Jennifer says
Hi ~ Just wondering if I can use grated parmesan cheese from the container? The kind you shake on pizza. Thanks!
In Fine Taste says
Hi Jennifer, you can try it if you like! I don't think the flavor will be as good as grated from the block, but I'm sure it will still taste delicious and add a nice salty, cheesy flavor.
- Alyssa
Barbara says
I was worried since after rising until doubled, the dough was quite sticky and not as dry looking as your photo. I baked it as directed and it turned out great! I used asiago cheese, fresh rosemary and garlic. I don’t have an instagram account to post a picture but it’s also lovely to look at!
Sarah B says
I've done asiago and herbs but I couldn't remember what I used for the herbs. I love garlic, I was thinking of doing Italian seasoning, as I don't have thyme on hand. hmmm. Got the dry ingredients ready, then do the cheese then warm water and wrap. Got my recipe from an old roomate Chef/baker/canned a bunch as well. Smart guy. Did you use fresh garlic? I have some and garlic powder and also minced garlic in EVOO.
Barbie Kent says
tasty beyond belief!